3) 1st Photoshop Creation
3.
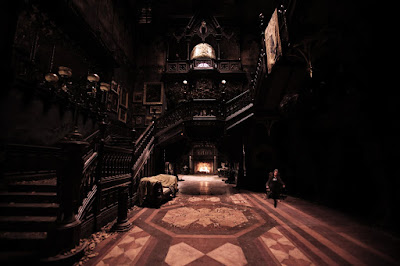
The Very First Own Creation - "Lonely Times" Here is that my firs experiment I've made to learn and keep on training the new learned basics of the Photoshop.
Firstly, I have chosen an image from an Internet website and always made sure that the image had its resolution of minimum 2K as it is very important to work using only high resolution photos.
Secondly, I created a "New...(document)" _ found in a "File" section - and in options changed the resolution of an image to 300 pixels/Inch.
- 300 pixels/Inch is a resolution used for prints - something we can see on a paper or a billboard.
- 72 pixels/Inch is a resolution used for digital works such as animation - something we look at through a digital screens such as phones or TV.
Also, this time I was assigned to create a postcard of a size 145mm by 105mm, which I can always check in a "Image Size..." that is found under an "Image" icon.
Once, I was ready with all the little details to do with my document, I then moved my found image from a website to this new document however, because the image was in a vertical position I had to rotate it using an "Image rotation" mode that can also be found under an "Image" icon.
To fit the image to the document, I then used a "Free Transform" mode - found in "Edit", shortcut for "Com"+ "T" - which allows me to change the size of an image whatever way I want. After that, I realized, I'd prefer the image to be the other way which means I had to flip it horizontally and this mode can be found either in "Edit" leading to "Transform" and " Flip Horizontal"/ "Vertical" or in "Image" leading to "Image Rotation" where's a "Flip Canvas Horizontal"/ "Vertical" allowing a whole canvas, including all layers, to flip.
Next, I duplicated the layer, just to be sure that if I would do something wrong, I'd always have a back-up - "Duplicate Layers" if found in "Layer" icon or under a shortcut of "Com" + "J". However, it is also very important to, in general, constantly keep on saving the whole work in one or more folders (making sure it's easy enough to quickly found it) using either "Save as..." ("Shift" + "Com" + "S") or just a "Save" ("Com" + "S") option, though I'd say it's much better to just make more new saves using "Save as..." than having just one save that could easily be ruined, accidentally saved or even delete , which means there would be a huge problem getting it back properly.
Moving on, this was a time I added a new picture, of the 'sitting me' that was cut out before but, because of my luck of knowledge by that time, I added a JPG image with me 'cut out' which means, the background was white instead of being 'transparent' like it is in a Photoshop though, at least, this forced me to keep on spotting my mistakes and memorizing the better ways, as well as keep on using different tools, such as the "quick selection tool" (shortcut for "W") to easily and quickly 'cut out' the unneeded background with a help of the "mask" I've been explaining about before. This allows me to keep on exercising the techniques of the usage of the tools.
Additionally, if for example, accidentally instead of selecting the background, we select the person and use a "mask", that person will get masked so it'll 'disappear'; to solve this, all it's needed, is to invert it with a shortcut of "Com" + "I" or click on the "Image", find "Adjustments" and select "Invert" - that will swap the selected person with the background.
Whenever I did something wrong, such as when I masked a bit too much of the person while masking the background, I've learned to quickly move back with the mistake by using the "Step Backwards" (shortcut for "Alt" + "Com" + "Z") or "Step Forward" ("Shift" + "Com" + "Z") that can also be found in "Edit". Clearly, allows me to to go back and forth with whatever movements I've been doing.
Once the person was ready to be placed in a right position on the image, I could either use the "Free Transform" tool or use a "Rectangular Marquee Tool" - shortcut for "M" - which selects the parts, clearly, using the rectangular shape. The selected part, such as the human in this situation, can then be moved using the "Move Tool" under a shortcut for "V".
Another, very helpful tool I've been using all the time is the "Zoom Tool" which, of course, allows me to zoom in or out to, for example smaller parts of the image, to be able to see them better, or while working with them. The shortcut is "Z" yet, I've mostly been using the "Com" + "+"/ "-" shortcut because, this one lets me zoom in or out without changing the tool I'm currently using.
The additional tool, instead of only training the basic techniques I've been gaining, is called a "Puppet Warp" that is found under "Edit". This tool allows me to transform specific points I wish to move or curve or resize of the chosen object on a specific layer. Such as here, I've extended only the legs of the person to make it look more fictional, beautiful but at the same time, very realistic.
For the last touch, after resizing that human and putting it into a sitting position on a chair, I used the "Curves" (shortcut for "Com" + "M") and "Hue/Saturation" (shortcut for "Com" + "U") modes to make the whole image look even more realistic and as if it's a one whole."Curves" make the image adjust and better highlight the contrast as well as the lightness of that place while, with the "Hue/Saturation" I can manipulate the atmosphere using colors. The both can be found under an "Image" and "Adjustments" or just in the "Adjustments" panel.

Comments
Post a Comment